Flipflop (or Ninja!) Socks
 |
whenever we go camping, i of course insist on wearing only flipflops. come nighttime, i realize that it’s far too cold, so i put on my giant fuzzy sleeping socks and cram my feet back into my flipflops. it’s not all that comfortable, so i came up with a solution. |
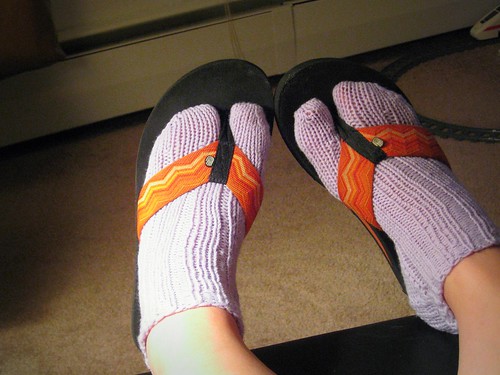
i’ve seen flipflop socks before, but i wanted some made with worsted-weight yarn so they’d be warmer and quicker to knit. these are knit on size 6 needles, and they’re super-quick! also, they remind me of tabi socks, so make up a pair in black, and voila! you’re a ninja.
(note: i always knit socks using the magic loop instead of 3 dpn’s, so i wrote the pattern in a generic way to be used with either method. just divide up your stitches amongst the needles however works best for you.)
Flip-Flop Socks
finished size: women’s medium
materials:
- any worsted-weight superwash wool or wool blend (i used some cheap stuff from jo-ann and was very happy with the results, especially since they cost under $5!) – 140-160 yards
- size 6 needles; either 2 circulars or a set of 4 dpns
gauge: 4.5 st/inch
CO 36 st loosely.
Work K1, P1 ribbing for 6 rounds.
Work K3, P1 ribbing for 5 rounds.
Place the first 18 st on one needle, and move the rest of the stitches to other needles or a stitch holder. The heel will be worked only over the first 18 stitches as follows:
Row 1: [sl 1, K1] to last stitch.
Row 2: Sl first stitch purlwise, P to end.
Repeat rows 1 and 2 until the heel flap measures 2″.
Turning the heel:
Row 1: K10, ssk, K1, turn work
Row 2: P4, p2tog, P1, turn work
Continue in this manner (knit to one stitch before the gap, knit 2 together, knit one, turn) until you have 10 stitches left.
With right side facing, knit across all 10 stitches, then pick up and knit 11 stitches along the edge of the heel. (When knitting on 2 circs, this would be the end of needle one. If you don’t want to do it this way, place a marker so you know where to decrease.)
Knit across the 18 held stitches in pattern (K3,P1 ribbing). PM if necessary. Pick up and knit 11 stitches along the other edge of the heel. 50 st total.
Gusset:
Round 1: Knit to last two st on first needle (or to marker). K2tog. Knit in pattern to marker. Ssk, then knit to end of round.
Round 2: Knit (with top of foot in pattern).
Continue decreasing every other row in this manner until 36st remain. Rearrange stitches so you have an even amount on each needle.
Knit until the foot is approximately 2″ shorter than you want it to be. (The easiest way to check the length is to try it on; you’ll want to stop knitting at the point where you’ll divide for the big toe.) At this point, you’ll switch to just knitting instead of the ribbing pattern.
Big toe:
K7. Place next 22st on holder. CO2 st, then knit remaining 7 stitches. Rearrange these 16 st to knit in the round, if necessary.
Knit 10 rows.
Next row: K1, ssk, knit to last 3 stitches, k2tog, K1. 14 st remain.
Next row: Knit.
Repeat the last two rows once more. 12 st remain.
Bind off using kitchener stitch, or draw yarn through remaining stitches if you prefer.
Toe cap:
Place held stitches back on needles. Place a marker at the outside edge, between stitches 11-12. Rejoin yarn and knit. At the end, pick up 2 st from the bottom of the big toe (where you cast on the two extra st initially) and join to knit in the round. 24 stitches total.
Knit two rows. (Note: please see comments below about the length of the toe cap; if you have longer toes, you’ll want to knit some extra rows here! Try them on to see. 🙂 )
Next row: K to 3 stitches before marker, k2tog, K2, ssk, knit to end.
Next row: Knit.
Repeat these two rows two more times, until 18 stitches remain.
Bind off using kitchener stitch.
Make a second sock, reversing the shaping for the toes.
Now you can sit by the fire all night! Please comment or email if you have any questions about this pattern.
Update: Melissa was kind enough to provide a French translation of the pattern. Click here for the PDF!
patterns | Comments (30)30 Responses to “Flipflop (or Ninja!) Socks”
Leave a Reply
Cute!!
I’m getting ready to go on a month long camping trip. I’ll be bringing your pattern with me!
[…] queenofsubtle flip-flop oder ninja […]
These are really cute! Any chance you also did them in sock-weight yarn? I want to make a pair of split-toe socks for my daughter, using the Harry Potter yarn. I’m wondering if you have adjusted this great pattern for a smaller gauge yarn. Thanks for posting this pattern!
i haven’t made them with sock-weight yarn, but you could try adapting these from knitty!
[…] queenofsubtle flip-flop oder ninja […]
Got a question…I’ve never made socks before but these look really neat. I was getting ready to make them but I’m confused. At the beginning when you CO 36 stitches…do you divide between 3 needles and join in the round???
Thanks so much for a wonderful pattern. Keep knitting!
cindel
yep, that’s correct! either 3 needles if you’re working in the round, or two if you’re using two circulars. thanks!
Sorry for bugging you again…..but I have a quick question, right here……….”With right side facing, knit across all 10 stitches, then pick up and knit 11 stitches along the edge of the heel. (When knitting on 2 circs, this would be the end of needle one. If you don’t want to do it this way, place a marker so you know where to decrease.)
Knit across the 18 held stitches in pattern (K3,P1 ribbing). PM if necessary. Pick up and knit 11 stitches along the other edge of the heel. 58 st total.”
I only get 50 stitches. Am I missing something? 10+11+18+11+50
Thank you. I really don’t mean to be a bother but I’m still learning. 🙂
From the previous comment….Thanks. I’m using the dpn’s since I don’t know how to use 2 circulars. I’d love to learn that as well. Is there a special name for using 2 circulars? If so, I’d love to look it up online and learn it. THANK YOU!
you’re right!! that’s an error. i’ll correct it asap. thanks for finding that.
i don’t think there’s another name for knitting with 2 circulars. using one is called the magic loop. i prefer the circs because you’re less likely to get gaps between the stitches like you sometimes do on 3 needles. also, far less likely to poke your eye out. haha.
here are some good instructions: http://www.az.com/~andrade/knit/twocirculars.html
Jenni, Thank you for taking the time to post back.
I’ll definitely check out the instructions you provided. Maybe for the 2nd sock, I’ll use that method. Since we are snowed in, I’m planning on knitting all day long. 🙂
cindel
I’m confused in making the toe cap. Instructions say to knit 2 rows, then to decrease 6 stitches within the next 6 rows. This makes the toe cap much shorter than the big toe, which is almost 2″ long. What am I doing wrong?
hi, caroline! let me take a look at mine tonight and i’ll let you know. i’m pretty sure that’s how i made them (the toe cap is shorter than the big toe), but i’ll count the rows to be sure.
hey, caroline! sorry for the delay… i kept forgetting to check. i counted the rows in my sock and the way the pattern is written is correct, at least as far as how mine are made. the toe cap is a lot shorter than the big toe. if that’s not right for you, i’d just knit a few more rows before starting the decreases!
Hi, I’ve finished my first sock and even tried it with flip flops on today and it feels great. I’d just like to repeat what one of your commenters said (Caroline on Oct 26th) about the toe cap. I had to decrease down to 12 stitches so that the toe cap was the same length as the big toe. When I tried it on before grafting the toe cap, my middle toes stuck out. My second toe is actually longer than my big toe. Anyway, I am happy with it now and am working on the second one.
thanks, nicola! clearly, i have short toes. 🙂 i’ll add a note to the pattern!
Is there anyway you can post the directions for the second sock, please? I’ve tried (and even sought the help of others) many times, but I can’t get it right. The first sock came out perfect, but the second has been lingering as an UFO for over a year now for me. I would be eternally grateful.
hi karen! i’ll do my best. 🙂 please let me know if you have any trouble with this… i’m not looking at the sock right now, so hopefully i got the reversing correct. just be aware that the decreases should always occur on the outside edges of the sock!
so, you work the 2nd sock the same way as the first, all the way through the gusset step (right before ‘big toe’ in the pattern). then:
Toe Cap
PM at the beginning of the round. (this should be with the top of the sock facing you.)
K11, put the next 14st on a holder (for the big toe), cast on 2st, K11. (24st total)
Knit 2 rows (or longer if you have longer toes… please see notes!)
Next row: K1, K2tog, knit to 3 st before the marker, SSK, K1.
Next row: Knit.
Repeat the last two rounds twice, ending with 18st.
Bind off.
Big Toe:
Place held stitches back on needles and arrange to knit in the round. PM at the outside edge, between stitches 7-8.
Starting from the marker (this should be with the underside of the sock facing you), rejoin yarn.
K7, pick up 2st from the bottom of the toe cap (where you initially cast on 2st), K7. (16st total)
Knit 10 rows.
Next row: K1, K2tog, knit to last 3 stitches, SSK, K1. 14 st remain.
Next row: Knit.
Repeat the last two rows once more. 12 st remain.
Bind off.
Thank you for your reply! It might take me a bit to give it a shot (got a truckload of things to do on my plate) but when I do I’ll let you know how it comes out.
I’m having a bit of trouble turning the heel of my sock. I’ve never made socks before and when I follow the instructions how I understand them it starts looking less and less like a sock.
Turning the heel:
***
Row 1: K10, ssk, K1, turn work [At this point I still have 5 unworked stitches when I turn to go the other way.]
Row 2: P4, p2tog, P1, turn work [By now I only have 2 lopsided and uneven rows and I’m totally lost.]
Continue in this manner (knit to one stitch before the gap, knit 2 together, knit one, turn) until you have 10 stitches left.
***
Any help at all would be appreciated.
hi, allycion!
what you’re describing sounds right to me. it looks confusing, but it works! you’ll always have unworked stitches at each end of the row as you go along, until the very end when the heel is complete. you’ll start to see a kind of triangular shape develop as you go, and that’s what will turn into the heel.
i always do better when i can see something being done, so i’d recommend looking up a video or tutorial on how to do short-row heels. after you’ve done it once, it makes a lot more sense!
I want to make these socks for my husband. He wears a mens size 10. How do I make the socks larger to fit him?
they easiest way would be to use larger needles and yarn!
I LOVE THIS PATTERN!!! I’ve been searching for years for a sock to wear with flip-flops and have never found one I really loved. Mostly because I wanted one made from worsted weight yarn instead of a 32 or 28 gauge. I LOVE flip flops and wear them year round even in frigid Wisconsin winters – usually stuffing my foot in wearing regular socks. Just finished my first pair and I love them! Thank you!!
Hi, Bonnie… I’m very glad to hear you like the pattern! Thanks for letting me know. 🙂
[…] it can’t be much longer before “ninja socks” are the latest thing in knitting. Oh wait! Share this:FacebookTwitterMoreDiggStumbleUponLinkedInRedditTumblrLike this:LikeBe the first to […]
I have got two almost complete socks but am using 48 sts. How would I divide the sts for this number? Jay
Hi Jay!
You’re talking about dividing for the big toe, correct? For 48st I’d probably do 9-30-9 since that’s about the same ratio of stitches. That will end up giving you 18st for the big toe and 30 for the others. You could also try 10-28-10 and see how that fits.
So basically for the big toe you’d K9, place 30st on a holder, and K9 again. Continue on from there.
Hi Jenni,
My 4 yr daughter loves to wear her flip flops year-round. Is there anyway you can help me adjust this pattern for the kiddies? I would be so grateful!!
Thanks! -Quynn
Hi Quynn,
Sorry I’m slow. 🙂 My best advice is to just use a lighter-weight yarn and smaller needles, because that way you can keep the same stitch counts. That’s usually a lot easier than trying to redo the math.